Upgrading to iOS 11 for your iPhone & iPad
by Amber Mac on September 20, 2017
After a long summer of beta-testing, Apple has now released iOS 11 to the masses. Here are some things you’ll want to know about before you upgrade.
Features
As usual, the design has been updated, but the new iOS has a slew of other changes, too, including:
- new control center (which is customizable)
- improved Siri (smarter & more natural voice)
- drag & drop (drag images & links between apps)
- Files app (new app to manage files on your device)
- AirPlay 2 (with multi-room functionality previously only on desktop)
- driving mode (expanded Do Not Disturb)
- emergency SOS (activated from the lock screen)
- smaller photos/videos (thanks to HEIF/HEVC file formats)
There are lots more (including some great iPad-specific updates), so check out Apple’s iOS 11 page for more details.
Should I Update?
Whether you update or not depends on three things…
- Do I want the new features? (probably “yes”)
- Is my device compatible? (iPhones prior to the 5s can’t, nor can the first iPad Mini or iPod Touch prior to 6th gen)
- Will it slow down my device? (a little too early to tell, so you might want to wait if you’ve got an older compatible device)
Just a note before we move on that, if you’re not able to update to iOS 11, still make sure to update to the latest version of your current OS, as there can be important security updates that you’ll want installed.
How Do I Update?
Don’t be one of those anxious updaters who finds themselves online complaining about having lost data because they needed to factory restore their phone after a bad update. The first thing you should do before you perform an update is back it up – period. In fact, since Apple provides two ways to back up your device from iTunes, one being to back up the most important info to iCloud (this alone is not enough!) and another being to do a full backup to your computer (always do this one at least), I’d recommend spending an extra few minutes and doing both.
So connect your device to iTunes, select it at the top right when it appears, go to the Backups section and first run the “This computer” backup and then run the “iCloud” backup. Once these have finished (this could take a while depending on your connection and how much data you have on your device, so don’t be surprised if you’re hanging around for 10+ minutes), it’s time to update.
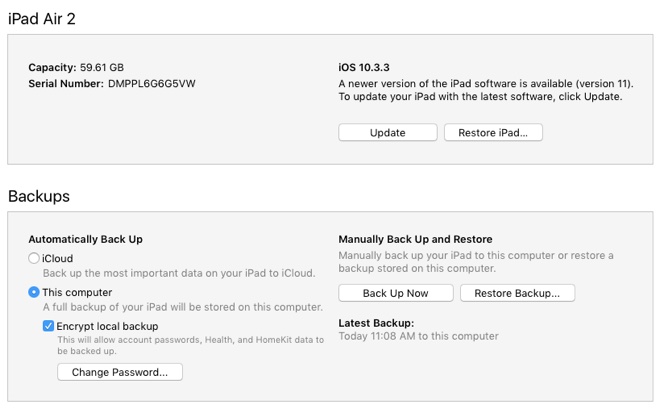
In the top section of your device’s page on iTunes, you’ll see its capacity and serial number and then, just to the right of these, you should see the current version of iOS on your device and, below this, an Update button (with details about the specific update above – make sure this is saying “version 11”). After you click the Update button, you’ll have to click Update again to verify the update with Apple, and then click Next when you see the update specifics (take a read through this if you want all the details). Then you’ll need to agree to the terms and enter the passcode on your device before the update starts.
Keep in mind that if you’re running updates very soon after they’re released, especially giant updates like a completely new iOS version, you may find yourself waiting a while. You can click on the rotating icon in the upper right corner of the iTunes window to see how long you have to wait for the download (although this isn’t always 100% reliable) and then the software will be extracted and installed on your device.
If you run into any problems, here is Apple’s iOS 11 update support page – good luck!